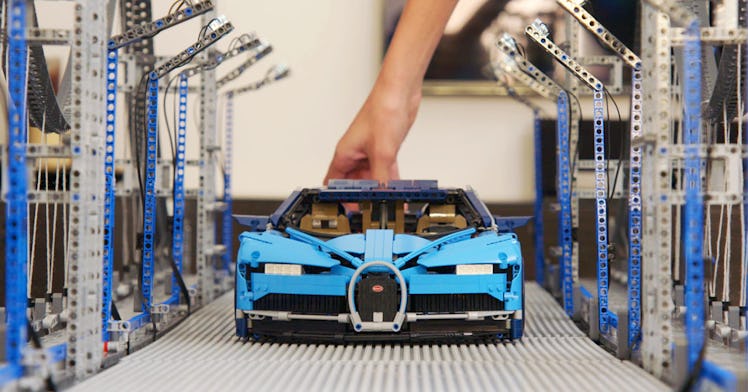
A Suspension Bridge Worthy of the New LEGO Bugatti Chiron
A father and son wanted a road worthy of the new LEGO Bugatti. So they went ahead and built a 7-foot-long, 32,500-piece suspension bridge.

This story was produced in partnership with LEGO Technic.
Iouri Petoukhov and his son have been building with LEGO bricks together for more than ten years. It started with simple towers and LEGO Classic car builds. Now, Petoukhov and his son are the masterminds behind the LEGO Technic YouTube Channel The Brick Wall and are constantly designing and building projects that look more like works of art than LEGO bricks. Their latest Technic venture? Building cityscapes to host the LEGO Technic Bugatti Chiron.
The LEGO Chiron was created in conjunction with Bugatti Automobiles S.A.S. and is comprised of 3,599-pieces that perfectly recreate the $3 million supercar (without a working 8.0 L quad-turbocharged W16 engine). For most builders, that project is enough. The Petoukhovs aren’t most builders. Iouri and his son first built a custom garage to house the car, and have just put the finishing touches on a massive 7-foot-long bridge for the Chiron to roll across.
“The Bridge project is our biggest ever,” Iouri says. “It was very challenging to guess the type and quantity of LEGO bricks required to complete the project — and the bridge was built using more than 32,500 LEGO bricks.”
The build didn’t always go as planned. “On a technical side, the middle section of the bridge gave us the biggest headache, so we ended up redesigning it from scratch five times until we found the right combination and interconnection parts.” Here’s a step-by-step breakdown of how they did it.
Step 1: The Plan
The Petoukhovs knew they wanted a huge bridge that looked like a suspension bridge you would see in modern cities around the world — complete with towers and LED lights. The complicated design required tons of planning. “We knew we’d have to build the bridge in a modular fashion, and we typically we don’t do that,” Iouri says. “Each structural element consists of several modules that connect together and can be easily disconnected if required.” The Petoukhovs outlined the design and found elements of the structure that were easier to assemble alone and then connect together.
Step 2: Measure the Modules
To know how many modules are needed for a build of this scale, you have to scale it out properly. Iouri calculated that in order for the bridge to look the way he wanted, it would have to measure four times the length of the Bugatti (approximately 88” long, 17” wide, and 10” high) with the length of the middle section of the bridge between the two support towers being approximately two times the length of the Bugatti and 36-inches high. “When we settled on the size it was a scary moment,” Iouri says. “It was too big. In fact, it was bigger than the size of the room where we usually build our projects. So we had to take over the living room.”
Step 3: Get Your Modules in Order
Iouri calculated that the support towers would require seven modules. The road would consist of four identical modules and the pathway and light post should be connected together. With that, he and his son got to work.
“We ended up with separate 29 structural elements to build,” Iouri says. “And then the hard work started.”
The pair built each component, in this order:
- Support towers (8 towers, 16 sections each)
- Section of the road (4 sections)
- Pedestrian path (6 sections)
- LED light poles
- Road surface
- Suspension tracks
Step 4: Make Some Adjustments
Because of the nature of any custom build, there was a bit of readjusting that needed to happen with the modules. “After all the elements were built we started the bridge assembly — which can also be known as the adjustment process,” Iouri laughs. “Not all elements were connected as expected — and that’s okay. You have to be inventive to solve those little problems and move things around to make it work. It took us three days of assembly before the bridge was finally completed.”
Step 5: Bring in the Bugatti
On the last day of the build, the Petoukhovs had to prepare the bridge for traffic — aka the LEGO Bugatti Chiron. Iouri made a few last-minute adjustments, including cutting suspension threads to the required length for the bridge and connecting the threads to the towers. Then it was time to test the bridge’s integrity under Bugatti load. It rolled across the light grey road just like it was made for it. “The best part of this project is knowing that we not only built a bridge, but we built a bridge that is structurally super strong,” Iouri says.
This article was originally published on